This post will walk through setting up a basic python development environment from scratch, based on Visual Studio Code, using conda as a package manager and git for source control. I will also lay out some general development best practices and guidelines that work well for me for the type of projects I typically work on. It is mainly intended as a compilation of information that I feel like should be very basic and included in any getting started tutorial, but is instead scattered across various docs, forums, YouTube videos, and blog posts. This has led to incredible amounts of head-banging as I just try to accomplish what should be a simple task of setting up a Python development environment ‘the right way’ for actual projects that go beyond ‘Hello World!’ scripts.
Install Software
Download and install Visual Studio Code.
Download and install Miniconda from https://docs.conda.io/en/latest/miniconda.html. Recommend to install only for current user and do not add to PATH.
Download and install git from https://git-scm.com/downloads
Install the Python extension for VSCode from the extensions tab
Configure the VSCode Integrated Terminal to Use the Anaconda Prompt
Type ctrl+shift+p to open the VSCode ‘Command Pallet’
Search for and select Preferences:Open User Settings (JSON)

Add the Anaconda prompt to the list of integrated terminal profiles:
    "terminal.integrated.profiles.windows": {
        "PowerShell": {
            "source": "PowerShell",
            "icon": "terminal-powershell"
        },
        "Command Prompt": {
            "path": [
                "${env:windir}\\Sysnative\\cmd.exe",
                "${env:windir}\\System32\\cmd.exe"
            ],
            "args": [],
            "icon": "terminal-cmd"
        },
        "Git Bash": {
            "source": "Git Bash",
            "path": "C:\\Program Files\\Git\\bin\\bash.exe"
        },
        "Conda": {
            "path": "${env:windir}\\System32\\cmd.exe",
            "args": ["/K", "C:\\Users\\user\\miniconda3\\Scripts\\activate.bat", "C:\\Users\\user\\miniconda3"]
        },
    },
To get the path and args required for the Anaconda prompt, look up the start menu shortcut properties:
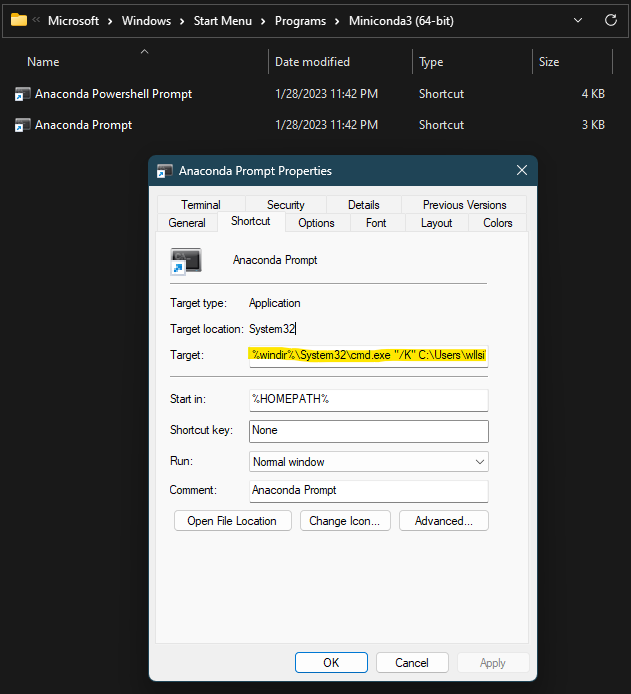
The first part is the ‘path’ variable, the remaining parts are the ‘args’. Convert the string to a JSON list, delimited at each space.
Set the Anaconda prompt as the default terminal profile with the following line inside the outermost JSON object
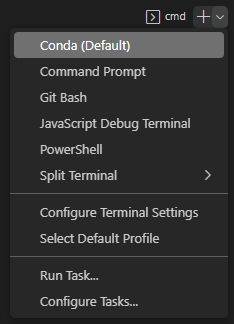
"terminal.integrated.defaultProfile.windows": "Conda",Test the setup by going to Terminal -> New Terminal. You can verify this is an Anaconda prompt by the (base) environment name preceding the working directory. You can also verify the default environment at the list here:
Configure git Credentials
Verify the git installation by running in any terminal git version
Configure your name with git config --global user.name "username"
For details, see https://docs.github.com/en/get-started/getting-started-with-git/setting-your-username-in-git
Configure your email with git config --global user.email "example-anonymous@github.com"
For details, including how to find your anonymous github email address, see https://docs.github.com/en/account-and-profile/setting-up-and-managing-your-personal-account-on-github/managing-email-preferences/setting-your-commit-email-address. Of course, you do not have to use an email address associated with github.com if you do not plan to push your commits to their service.
Verify the settings with git config --global user.email
You may now use git features built into the VSCode ‘Source Control’ tab. The first time you use it, it may ask you to authenticate with Github via a browser. Afterwards, your credentials will be saved using the Windows credential manager.
(Recommended) Configure Globally Git Ignored Files
Create a global .gitignore_global file in a convenient directory, such as your home directory, and add relevant rules to it.
Tell github to use this as a global gitignore file:
$ git config --global core.excludesfile ~/.gitignore_globalRecommended rules to add to .gitignore_global, compiled by GitHub user octocat, are the following:
# Compiled source #
###################
*.com
*.class
*.dll
*.exe
*.o
*.so

# Packages #
############
# it's better to unpack these files and commit the raw source
# git has its own built in compression methods
*.7z
*.dmg
*.gz
*.iso
*.jar
*.rar
*.tar
*.zip

# Logs and databases #
######################
*.log
*.sql
*.sqlite

# OS generated files #
######################
.DS_Store
.DS_Store?
._*
.Spotlight-V100
.Trashes
ehthumbs.db
Thumbs.db
For details on how to build .gitignore files, see https://git-scm.com/docs/gitignore.
Many more .gitignore templates can be found at https://github.com/github/gitignore.
(Optional) Activate ‘Settings Sync’ in VSCode
Visual Studio Code can automatically back up and sync your settings across multiple devices. On the lower left side of the window, there should be an account icon that you can use to log in using a Github account. Activate Settings Sync, and any other devices signed into this account on VSCode can sync their settings.
Python Development Best Practices
To be clear, these are guidelines that I have found work well for me, given the types of projects I work on, and are by no means definitive ‘Best Practices’ agreed upon by any expert or community.
Creating New Projects
Each project should be initiated as a git repository to have proper source control. First, create a new directory for the project on your filesystem. Open this directory in VSCode. You can add some initial files and code now, if you want. This is also a good time to create an environment.yml file (see below). Once ready, head to the source control tab, and it will ask you to initialize the repository. Go ahead and initialize it. If you want to publish this to GitHub, go ahead and enter a commit comment and click ‘Publish Branch’. It will give you the option to publish publicly or privately.
Conda Environments
In general, it is a good idea to have a conda environment for each project you work on. This allows you to keep your system default python installation clean from unnecessary packages, and to specify python and package versions to avoid compatibility issues. It is also very useful for easily porting your projects to other machines or sharing with other people, as they can easily set up an identical conda environment from a environment.yml file, which can (should) be included in your repository’s source control.
Open an Anaconda prompt in the working directory (if you followed the preceding setup correctly, simply go to Terminal -> New Terminal). The following method is the most basic way to create an environment, but not recommended.
Create and activate a new environment:
conda create -n envname
conda activate envname
If successful, the prompt should now be prepended with (envname). You can install packages as needed with, for example, conda install pandas.
The Conda recommended way is to manually create a environment.yml file in your repository, and use this to create and update your environment with the following commands.
conda env create -f environment.yml
conda env update -n envname --file environment.yml --prune
This has the benefit of inherently keeping the environment.yml file up-to-date in source control, and easier to read as it does not contain the fully solved environment. Note that the environment itself will have all required sub-dependencies, and these will be included if it is subsequently exported.
Example environment.yml: (for details, see https://conda.io/projects/conda/en/latest/user-guide/tasks/manage-environments.html#create-env-file-manually)
name: data-science
channels:
- defaults
dependencies:
- python=3.9
- pandas
- bokeh=2.4.2
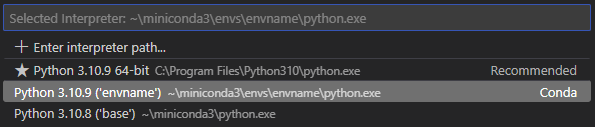
- pipIt’s important to remember to tell the VSCode Python extension to use your new environment. Type ctrl+shift+P and find “Python: Select Interpreter”. Once you open this window, you can select the correct environment (click refresh if you don’t see a newly created environment). Now, Terminal -> New Terminal will automatically activate your environment at launch. Alternatively, the correct environment will be used if you open VSCode from an Anaconda prompt that is already in the correct environment and working directory with code .

Useful conda commands:
conda listLists all packages in the current environment, and their versionconda info --envsLists all environmentswhere pythonShows the path of the current python executable, to verify the environment is set up correctly.conda create -n envname python=3.9Create a environment with a specific Python version installedconda install scipy=0.15.0 pandas matplotlibInstall a specific version of a package, install multiple packagesconda env create -f environment.ymlCreate a environment from a fileconda env update -n envname --file environment.yml --pruneUpdate the environment from its .yml file. –prune causes it to also remove packages that are no longer requested.conda env export | findstr /V "^prefix: " > environment.yml(Windows cmd)conda env export | Select-String -NotMatch "^prefix: " > environment.yml(Windows powershell)conda env export | grep -v "^prefix: " > environment.yml(Mac/Linux) Export the current environment to a file. The grep removes the absolute path of the environment files (which is not necessary to recreate the environment) to allow safely sharing .yml file and/or including it in the source control.conda create --prefix ./envs python=3.9 pandas matplotlibSpecify location of an environment to the./envsand install some packagesconda remove -n envname --allRemove an environment
Warning for pip usage: If you need to use pip to install a package, you must first install pip into the current environment with conda install pip (or include it in environment.yaml). Otherwise, you will be using the pip version from outside your conda environment, and this pip will install the packages globally. After pip has been installed into the conda environment, this pip will be used by default and any packages will be installed into the correct environment.
Where to store your env files: Placing the environment files within the project directory with conda create --prefix ./envs has some advantages in terms of project portability, but it also adds clutter to your directory and makes finding and activating the environment by --name (-n) impossible. Rather, you must find the environment with --prefix /absolute/path/to/envs. My preference is to keep the environments in their default location, and keep an up-to-date environment.yml in the repository for portability.
Secrets, Configs, and other ignored files
Before checking your initial git commit, you should create a .gitignore file. This file should contain references to any repository-specific files that should not be shared or published, such as those containing private API keys/tokens, non-default configurations, log outputs, node packages, etc. System generated files such as thumbnails, DS_Store, and related files should be excluded globally as noted above, and best practice is not to include them here since there is no need to share these exclusions with other users.
A common scenario is a configuration file with some customizations and perhaps a private API key. Although we cannot share this file, we may want to share the file template so the user can easily modify it with their own information. One approach would be to include file named similar to config.yaml.example and provide instructions in the readme for the user to personalize this file and rename it to config.yaml.
If you add a new secret file, make sure to include it in .gitignore before commiting the changes in git. Once it’s in the source control history, it will be very difficult to remove later.
Leave a Reply
You must be logged in to post a comment.