After a trip to a beach with my kayak on the Rav4 roof, I quickly realized I needed some way to rinse it off before tying it down to the car. The gravelly sand was sticking all over the kayak bottom, and was very difficult to clean from between the foam blocks and the bottom of the boat, which would have scratched up the boat if it was tied down like that. Of course, having a shower/hose-down station would be hugely convenient for various camping, swimming, scuba, and freediving trips, regardless of the kayak.
I set off on an internet search for what was commercially available, and what DIY solutions people come up with. Complete kits are available from a few manufacturers, and they generally fall into three categories:
- Gravity fed – These can either be a bag hung from a high place, or a tank on top of the car roof. This is a common style to DIY for overlanders, where a tank made from a large diameter PVC pipe is strapped to the roof. Aside from the limited capacity and wanting water pressure, there’s something unsettling to me about having such a heavy object so high on your vehicle and – especially for the DIY ones – often shoddily attached. And that’s aside from the logistical issues of storing such a long object when not in use – and filling it (since you obviously can’t fill it in your kitchen sink before mounting it). The Yakima RoadShower combines this style with the ability to pressurise using an air compressor, but costs a whopping $449 for a 4 gallon capacity.
- Relying on air pressure pumped in by hand or foot – sounds like a lot of work for a very limited capacity and rapidly decreasing water pressure
- Using an electric water or air pump – some of these even have heaters, such as the Geyser Systems Portable Shower ($324.95 for less than 1 gallon of capacity – YIKES). Many are battery powered – which drives up the price and makes me cautious of their water pressure. A battery also seems pointless since this will be used at the car, which has a built in high power battery and generator. One thing they all have in common – they generally start at over $300, and offer only modest capacity.
It quickly became clear none of the commercial solutions were ideal, and were incredibly overpriced for the capacities they offer, so I set off to design my own system. I laid out the following design requirements and considerations:
- Large capacity
- Good water pressure
- Flexible use cases – kayak/dive gear rinse-down, camp shower, etc
- Compact portable design that could easily be moved between storage and either of our two vehicles
- Running on 12V car power is fine, since it will never be used away from a vehicle.
I knew a 12V water pump should form the heart of this build, as it could put out good pressure and run continuously without ever losing pressure. After sifting through several cheap looking, no-name Amazon listings, I found this kit from SEAFLO that was perfect – it even included most of the ancillary pieces I was expecting to have to purchase separately (coiled hose, sprayer, intake filter, and fittings). While a bit on the expensive side, I was happy to pay more for a reputable brand, especially for something that could potentially be a fire risk if cheaply made. This pump has a couple key features I needed, that many cheap 12V pumps do not: an included pressure activation switch, self-priming capability, and thermal cutoff. The pressure switch acts to turn off the pump when the sprayer nozzle is not engaged. As soon as you engage the sprayer, the pump will sense the pressure drop, and automatically turn on again. To my surprise, this worked incredibly well, even without a pressure accumulator. I was expecting to need to install an accumulator (and it may still be a great option in some scenarios), but initial testing showed that the system is able to hold onto adequate pressure when the sprayer is not in use, that the pump isn’t constantly cycling, and it is also outputting good water pressure without stuttering when the sprayer is being used. Also to my surprise – this pump is QUIET! This is an excellent example of ‘you get what you pay for.’
Now that I had the pump sorted, I needed a water reservoir. I decided on a couple standard jerry cans for their portability, flexibility of use, and capacity (which can be expanded or contracted as needed by simply bringing more cans). Excellent. Now some 1/2″ vinyl tubing to act as the water pick-up line, and we’re off. The vinyl was coiling up inside the can, which was no good. It was also a bit too large to easily fit inside the small hole on the jerry can. A trip to Home Depot and I found that PEX pipe has ideal rigidity to act as a pickup line, while being thinner than an equivalent inner diameter sch 40 PVC, allowing it to easily fit inside the jerry-can. A couple brass fittings to hook it to the vinyl tubing added a bit more expense than ideal, but I was committed at this point.
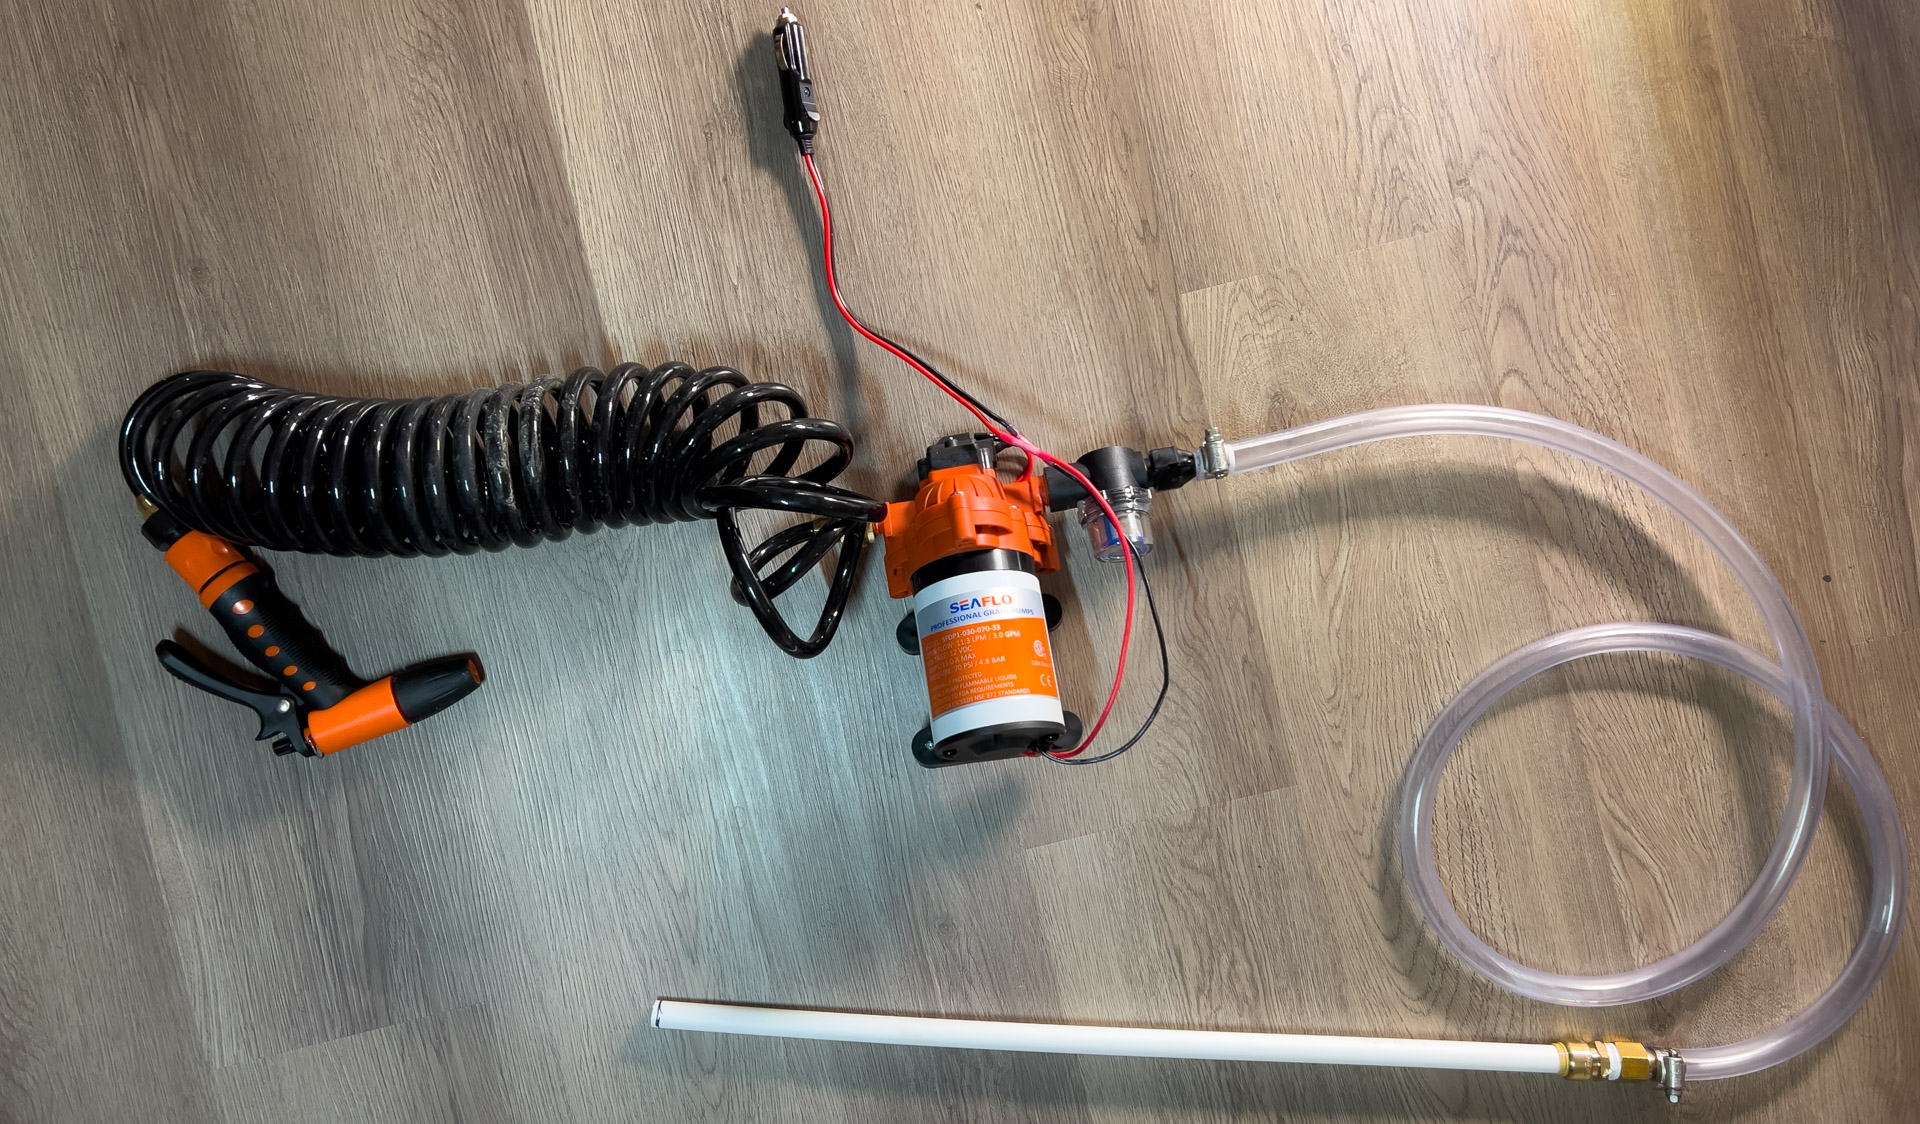
At this point the plumbing was done, and I had connected a 12V cigarette lighter plug to the pump’s DC input. I had also installed a new 12V outlet in the back of the Rav4, since it only had one plug in the front dash. I used a add-a-fuse kit and a plug that Chase left in my possession after a failed dash cam install, along with some 10 AWG wire. At the back, I installed a low-voltage cutoff switch so this could run with the engine off, without risking draining the battery too much. In practice, the cut-off was triggered after only a few seconds (although I did have it on its most conservative setting), so realistically the pump can and should only be run when the engine is on, rendering the disconnect unnecessary.
Now I had a completely functional system, and I tried it out for a spearfishing trip. It worked phenomenally! The water pressure was strong, it was quiet, and two 5 gal cans were just enough to thoroughly wash down all my gear and rinse myself off. Multiple people walking nearby even stopped to admire the fact that I had a fully pressurised shower coming out of my Mazda3 sedan. The only thing left to tackle was putting it all together in a more self-contained, portable package, rather than letting the pump, tubing, and wiring dangle all over my passenger’s seat.


After a lot of ideas, including hanging the pump off the jerry can handle, installing it permanently to the car, and building some sort of wooden or metal cage, I finally settled on building a stand out of a rigid plastic sheet that would fit right next to the jerry can. I sketched out a design in Fusion 360 using its sheet metal tool that would let make a self-supporting stand out of a single sheet, with one strategic cut and a bend. I decided on HDPE, as it is rigid, easily machinable, and has a workable glass transition temperature.

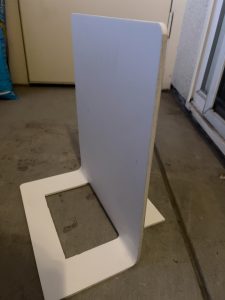
After a fruitless trip to Home Depot, I found a website that lets you order HDPE in the exact dimensions you want. They even rounded the corners for me! Again, slightly more expensive than some of the cheapest options, but I got straight cuts, perfectly radiused, and had no plastic waste and much less work cutting it to size. Plus, this supplier even has datasheets available so you know the exact quality of the plastic you’re buying. All I had to do was one cut with a dremel, and then bend the bottom flaps out in opposite directions, at perfect 90° angles. My Harbor Freight heat gun made (slow) work of the bend. I followed some advice from Adam Savage and used some metal bars to act as a heatsink, concentrating the heat within about a 1″ thick line, making it easier to get a straight bend. Slow and steady heating eventually made the plastic bendable, and after initially bending the flaps out in opposite directions, pressing it into the concrete floor while continuing to apply heat was eventually able to get the flaps out to 90°.
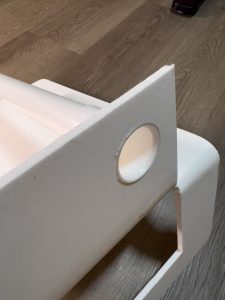
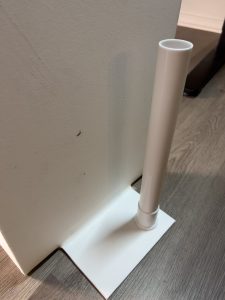
Once I has the base formed and cooled, I mounted the pump. I had already picked up a plastic drain extension tube from home depot, which had a 1.25″ NPT thread I planned to use to hold the coiled hose. I was hoping that the 0.25″ thick HDPE would be enough to tap and hold the threads. I was amazed that it was indeed, and installation was a breeze (once I figured out that I needed to drill a 1.5″ hole in order to tap a 1.25″ thread… ahh, imperial system). As an unexpected bonus, this was also the perfect place to store the PEX water intake pipe. I cut out a handle with the Dremel, and it was complete.
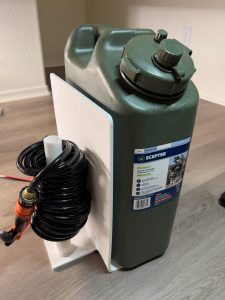

I couldn’t be happier with how this turned out – it is powerful, portable, modular, and quite. The capacity is limited only by the number of jerry cans you bring (which can also be used for general water-holding purposes when camping, making it extremely versatile). I would recommend to always run it with the engine on to avoid draining the car battery, and make sure not to leave the pump plugged in if the intake isn’t submerged, or if you run out of water, as this could eventually burn out the pump.
This did turn out to be a bit expensive at around $230 (excluding some tools purchased for this). You could certainly save some money buying cheaper components, but I’m really happy with the quality of everything. It feels high end and well built. Moreover, it’s still about half the price of what I would consider to be a comparable unit on the market. And in my opinion, this far outperforms anything on the market in terms of capacity, portability, and convenience.
Materials
| Quantity | Item | Supplier | Unit Cost |
|---|---|---|---|
| 1 | 1-1/4 in. x 12 in. White Plastic Slip-Joint Sink Drain Extension Tube | Home Depot | $ 5.72 |
| 1 | 1/2 in. x 5 ft. White PEX Pipe | Home Depot | $ 3.22 |
| 1 | 1/2 in. Push-to-Connect x FIP Brass Adapter Fitting | Home Depot | $ 8.37 |
| 1 | 1/2 in. Barb x 1/2 in. MIP Brass Adapter Fitting | Home Depot | $ 6.57 |
| 1 | 1/2 in. I.D. x 5/8 in. O.D. x 10 ft. Clear Vinyl Tubing | Home Depot | $ 6.83 |
| 2 | 1/2 – 1-1/4 in. Stainless Steel Hose Clamp | Home Depot | $ 1.85 |
| 1 | 12″ x 21″ x 0.25″ Marine Board HDPE, Rounded Corners, Shipped | TAP Plastics | $ 41.42 |
| 2 | Scepter 5 Gallon Water Container | Amazon | $ 44.25 |
| 1 | Male Cigarette Lighter Plug | Amazon | $ 4.50 |
| 1 | SEAFLO 33-Series Washdown Pump Kit | Amazon | $ 99.99 |
| 1 | Various electrical wire, connectors, plumbers tape, etc | Self | $ 10.00 |
| Total | $ 232.72 |
Tools/Other Items
| Item | Supplier | Unit Cost |
|---|---|---|
| (optional/not recommended) Low Voltage Disconnect | Amazon | $ 25.00 |
| Drill America 1.25″ NPT tap | Amazon | $ 28.31 |
| 1.5″ Spade Bit | Home Depot | $ 7.67 |
Leave a Reply
You must be logged in to post a comment.